Deskrawl Monk Build Guide: Master the Hundred Hands & Critical Dodge Engine
Conquer Inferno difficulty in Deskrawl with this ultimate Monk build guide. Learn optimal talent allocation, BiS gear, and combat synergies.
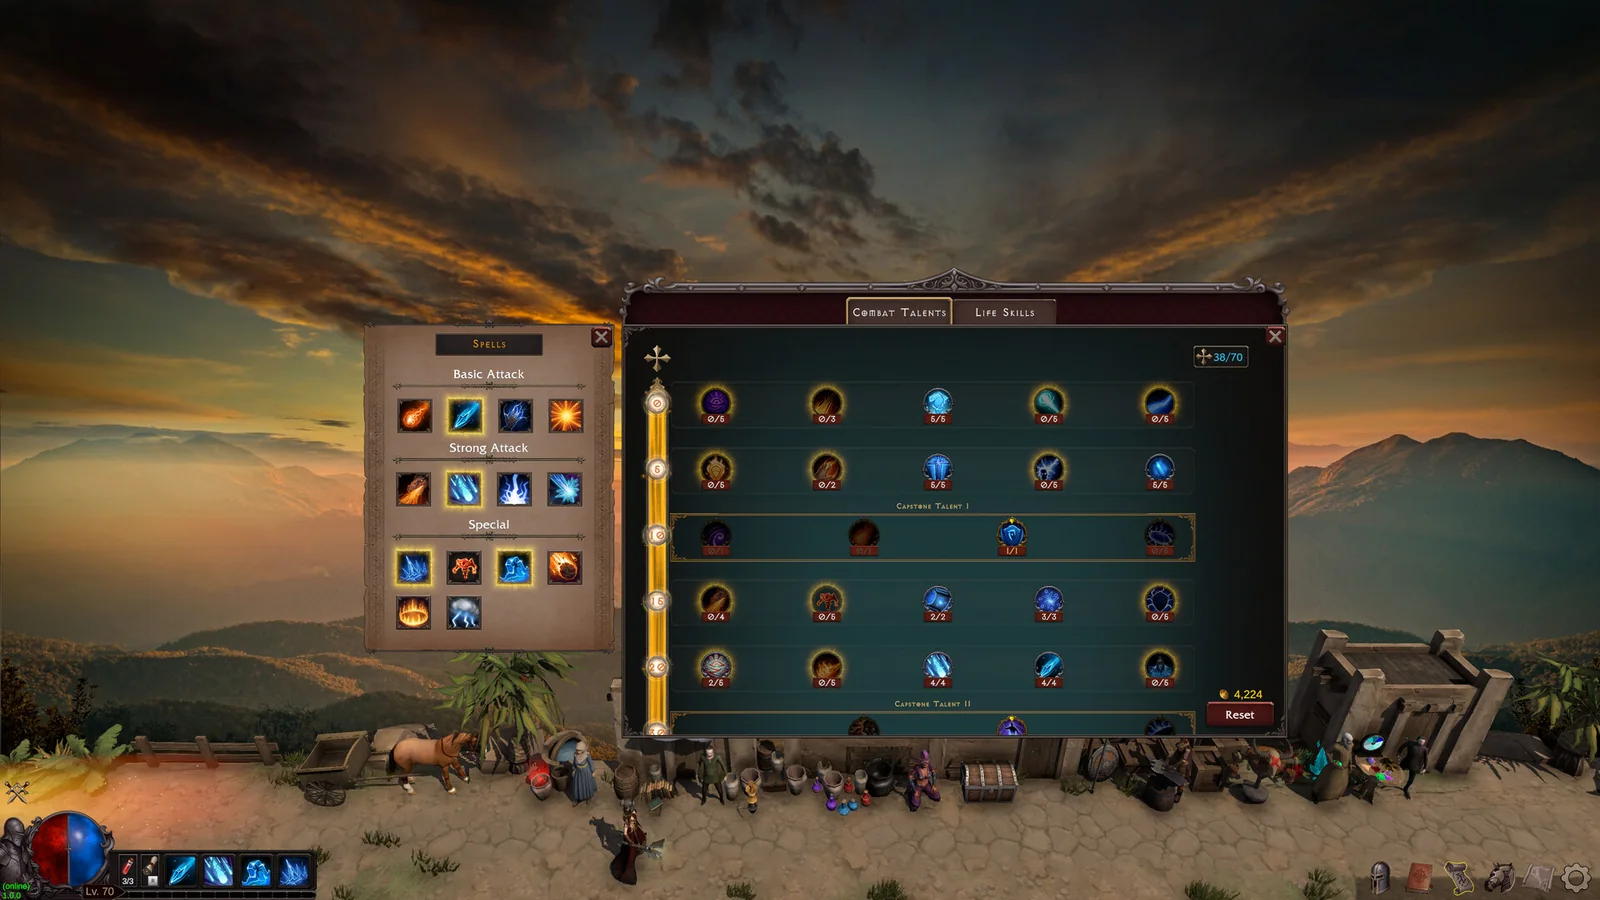
When tackling high-tier endgame content in Deskrawl, choosing the right setup can make or break your progression. If you want a top-tier Deskrawl monk build that scales seamlessly into Nightmare and Inferno difficulties, you need to understand how offensive survivability works. Mastering a specialized Deskrawl monk build allows you to turn your defensive avoidance stats directly into devastating offensive multipliers, letting you shred bosses while remaining nearly untouchable in melee range.
Core Philosophy & Multiplicative Synergies
As you push into higher difficulties in Deskrawl: Idle ARPG, incoming boss damage quickly outscales basic health pools and traditional armor mitigation. To survive and thrive, this physical martial artist build relies on a deeply interconnected multiplicative engine rather than raw defensive stats.
The centerpiece of this setup is the Tier 60 capstone talent, Formless. This passive grants bonus Critical Strike Damage equal to your total Dodge Chance percentage. When paired with Zephyr's Flow, every successful dodge continuously restores your mana. Furthermore, Mirror Steps adds a flat physical damage bonus after every dodge, maintaining near-100% uptime during hectic melee engagements. Combined with the Hundred Hands rune set—which doubles basic attack damage and triggers free Golden Palms casts—your damage output skyrockets.
| Synergistic Mechanic | Source / Talent | Primary Effect in Combat |
|---|---|---|
| Critical Conversion | Formless (Tier 60 Capstone) | Converts total Dodge Chance directly into bonus Critical Strike Damage. |
| Infinite Mana | Zephyr's Flow (Tier 10) | Restores mana continuously upon dodging enemy attacks. |
| Flat Damage Bonus | Mirror Steps (Tier 5) | Triggers a free Phantom Strike adding flat physical damage after dodging. |
| Attack Cadence | Hundred Hands Rune Set | Doubles basic attack damage and automatically triggers Golden Palms for free. |
Optimal Combat Talents and Leveling Path
At Level 60, you have exactly 60 talent points to spend. Because you cannot max every node, every single point requires strict justification. Rows unlock progressively based on total points spent, and capstones at specific tiers are mutually exclusive.
According to community reports and veteran testing, avoid misallocating early points into dead-end paths. Below is the verified 60-point distribution for the ultimate endgame setup.
| Level Milestone | Talent Node Allocation | Point Distribution & Rationale |
|---|---|---|
| Levels 1–14 | Agility & Flurry | Max Agility (8/8) for early dodge scaling; Max Flurry (6/6) for necessary attack speed. |
| Level 15 | Mirror Steps | Invest 1 point to unlock Capstone I, enabling free Phantom Strikes upon dodging. |
| Levels 16–20 | Zephyr's Flow | Max Zephyr's Flow (5/5) to secure infinite mana sustain via dodging. |
| Levels 21–30 | Fundamentals | Max Fundamentals (10/10) to maximize base weapon attack damage. |
| Level 31 | Gathered Force | Invest 1 point in Capstone II to empower every 5th basic attack. |
| Levels 32–40 | Vigor & Heavy Hands | Max Vigor (8/8) for physical crit chance; put 1 point into Heavy Hands as a bridge. |
| Levels 41–50 | Spirit Twin & Heavy Hands | Max Spirit Twin Duration (6/6) and finish Heavy Hands (5/5) for massive Strong Attack scaling. |
| Levels 51–60 | Golden Palms & Formless | Max Golden Palms damage/mana cost (8/8), take 1 point in Exploit Weakness, and finish with Formless (1/1). |
Best-in-Slot (BiS) Equipment & Affix Priorities
Assembling the right gear pieces dictates how efficiently your character clears maps and melts bosses. For rare and epic gear before you transition into full legendaries, you should prioritize specific affixes per slot.
| Equipment Slot | Primary Affix Priority (High to Low) |
|---|---|
| Weapon | Flat Weapon Damage > Physical Damage % > Basic Attack Damage % > Critical Strike Damage % |
| Helmet & Chest | Dodge Chance % > Cooldown Reduction > Max Health % > Physical Damage Reduction % |
| Gloves & Amulet | Critical Strike Chance % > Critical Strike Damage % > Attack Speed % > Dodge Chance % |
| Rings | Critical Strike Chance % > Critical Strike Damage % > Dodge Chance % > Life on Hit |
When transitioning to end-game legendaries, specific unique powers elevate your damage and defense to new heights. You can inspect detailed community database resources on the official Steam Community Hub for Deskrawl to track seasonal drops and community patch changes.
| Equipment Slot | Best-in-Slot Item | Unique Power & Build Synergy |
|---|---|---|
| Gloves | Deflecting Handwraps | Each stack of Furious Fist grants +1% Dodge, directly boosting Critical Strike Damage via Formless. |
| Weapon | Soulrender | Grants a chance to build Soul Harvest, unleashing 800% Physical Damage AoE nukes and stuns. |
| Chest | Evasive Cuirass | Grants additional Physical Damage Reduction equal to 50% of your total Dodge Chance. |
| Amulet | Pendant of Vigor | Increases total damage by +75% while Healthy (>80% HP), easily maintained via Life on Hit. |
| Rings | Ring of Revelation & Charged Ring | Stack standing still bonuses and constant max-mana scaling for massive damage increases. |
Paragon Allocation and Life Skills
Long-term account growth relies heavily on your Life Skills tree. Prioritizing Item Find / Magic Find first ensures you gather the necessary pieces for the Hundred Hands rune set and Deflecting Handwraps quickly. Following that, invest in Gold Find to fund crafting and carriage upgrades, followed by XP Gain to accelerate your climb to Level 60.
Once you reach Level 60 and unlock the Paragon system, distribute your points according to these tactical priorities:
| Paragon Category | Priority Stat | Mechanical Rationale |
|---|---|---|
| Core | Dexterity & Movement Speed | Dexterity increases martial skill damage infinitely; cap movement speed at +25% for fast clears. |
| Offense | Critical Strike Chance & Damage | Guarantees nearly every hit from Furious Fist crits, multiplying your Formless scaling. |
| Defense | Dodge Chance & Magic Resist | High dodge prevents damage entirely while fueling your critical strike damage conversion. |
| Utility | Life on Hit | At extreme attack speeds with 20 stacks, heals your entire health bar instantaneously. |
Active Skills & Companion Synergies
Your active ability bar must be optimized to maximize your attack cadence and defensive uptime. For this specific martial arts setup, do not swap out core synergy skills.
| Skill Slot | Recommended Ability | Combat Role & Function |
|---|---|---|
| Basic Attack | Furious Fist | Generates up to 20 momentum stacks for extreme attack speed at zero resource cost. |
| Strong Attack | Golden Palms | Automatically and freely triggered by your 6-piece rune set bonus. |
| Special 1 | Wind Steps | Provides a massive temporary spike to your total Dodge Chance. |
| Special 2 | Spirit Twin | Summons a clone that mirrors all basic and strong attacks in real time. |
Companions also play a massive role in your overall effectiveness. During early progression, the Bloodmoon Werewolf provides an active attack speed boost to help you reach maximum stacks instantly. In the mid-game, the Ice Hound offers crucial crowd control and shielding. For pure boss DPS in Inferno difficulty, swap to the Cinder Lord, whose active skill grants a massive Critical Strike Damage multiplier that synergizes perfectly with Formless.
Frequently Asked Questions
How does Formless change how I gear my character?
Formless converts your total Dodge Chance percentage directly into bonus Critical Strike Damage. This means defensive dodge rolls on your helmet, chest, and rings double as major offensive power boosts, removing the traditional trade-off between defense and offense.
Why is Hundred Hands considered essential for this setup?
The 6-piece Hundred Hands rune set doubles your basic attack damage, provides up to +60% physical damage through stacks, and automatically triggers free Golden Palms casts, forming the core engine of your damage output.
Can I run a lightning-focused variant with this talent tree?
While lightning variations exist and offer strong area-of-effect damage through orbs and thunder storms, the physical setup outlined here scales more reliably with high dodge-to-crit conversions and sustained melee attack speed.
Related Guides
Deskrawl Best Class Guide: Finding the Ultimate Character Pick for Idle ARPG Dominance
Discover the Deskrawl best class with our comprehensive guide. Explore class tier lists, builds, and strategies to conquer Inferno difficulty effortlessly.
Deskrawl Builds Guide: Master the Ultimate Monk Critical Dodge Setup for Inferno Difficulty
Discover the best Deskrawl builds for endgame success. Master the Monk Hundred Hands and Critical Dodge setup to conquer Inferno difficulty.
Deskrawl Classes Guide: Complete Tier List & Best Builds for Idle ARPG
Discover the best Deskrawl classes with our complete idle ARPG tier list. Compare boss DPS, farming efficiency, and survival builds for every hero.
Deskrawl Crit Build Guide: Master the Ultimate Endgame Monk Setup
Dominate Inferno difficulty in Deskrawl with the ultimate crit build. Learn talent allocations, best-in-slot gear, and stat hardcaps for the Monk class.